Saturday, October 18, 2025

My talk from Hono Conference 2025

I’m very excited to be speaking at Hono Conference 2025. As a permalink for what I’ll be speaking about there, this post is an overview of my talk, pertinent links, and other things related to the talk.

Resources

Cloudflare Workers x Hono

My talk is about Cloudflare Workers and Hono - how they pair well together, and my history with each of them. Here’s some longer form thoughts on that.

I began working at Cloudflare as a developer advocate in 2019. At that time, Workers was pretty new. But the platform was very powerful. I came from a background of building on AWS Lambda, so I was familiar with the idea of building serverless applications - specifically, with Node. Workers was (and still is) not Node, so in addition to learning the differences between the Workers platform (not being able to use express being one of the primary differences) there was also ergonomic differences in writing Workers applications. The standard Workers application in 2019 was implemented as a service worker, using an event listener to hook into a fetch event and return a response:

addEventListener("fetch", event => {
  return new Response("Hello, world")
})

This code was concise, but I quickly learned it didn’t scale well to full applications. Specifically, routing became a primary concern in many of the fundamental tutorials I wrote in 2019-2020 for the Cloudflare Workers documentation. There were some solutions that popped up (itty-router was one of the primary precursors to Hono that I became familiar with), but there wasn’t a true full-stack routing system for Workers that felt native to the platform.

The second variant of a Workers application became available later, called a “module worker”. This format looked like an ES module, and was built to eventually support multiple classes and entrypoints inside of a single application. The syntax was even more concise, which was great:

export default {
  fetch: request => {
    return new Response("Hello, world")
  }
}

As the platform matured, and the platform made use of module workers more effectively, you could define additional events inside of that module, as well as other classes that could be exported side-by-side with the module, such as Durable Object classes:

export MyDurableObject extends DurableObject {
  function fetch(event) {
    return new Response("Hello from a Durable Object")
  }
}

export default {
  fetch: request => {
    return new Response("Hello, world")
  },
  scheduled: event => {
    // Handle a reoccurring scheduled event
  }
}

In the following years, the bindings concept in Cloudflare Workers became more poewrful, and ubiquitous in large-scale Workers applications. Bindings allowed the Workers runtime to hook various resources from the larger ecosystem (what we began to thematically refer to as the “Cloudflare Developer Platform”, or “Workers Platform”) directly into your Workers application. This meant that tools like Workers KV, an eventually-consistent key-value store, and later, Cloudflare D1, our SQLite database, could be used directly in Workers applications without any additional setup code - you could create the resource, define the binding in a configuration file, and it became usable immediately:

# wrangler.toml
name = "my-workers-app"

[[kv-namespaces]]
id = "f39f24ff-15c2-4dbd-a21e-b0d657bef48f"
binding = "KV"

The KV namespace, identified via the namespace ID, became available as KV:

export default {
  fetch: async (request, env) => {
    const message = await env.KV.get("message")
    return new Response(message || "Hello, world")
  }
}

In short, there were a number of additions to the ecosystem that made Workers incredibly compelling from an ergonomics perspective. It was concise, and powerful platform-level primitives were usable via just a few lines of code. But it still was missing a fundamental way to built large-scale, fullstack applications in a friendly way.

Enter Hono

I first came across Hono in 2021 via a pull request. During that time, I spent a good part of my day-to-day reviewing pull requests, and helping grow our documentation for Workers and the rest of the associated developer platform tools. I’m sad to say that I missed the initial PR where Yusuke Wada, the creator of Hono, added it to our examples section of the Workers docs, but I caught the second PR, with a few typos and bugfixes. I don’t think we had a large amount of interest in Workers (at least, from my knowledge at the time) from developers in Japan, so seeing Yusuke contribute a pull request caught my eye. I followed the link he shared to hono.dev, to check out the framework.

I was immediately very impressed. Hono looked like a great solution to the problem we had faced, not just on the developer relations team, but on the Workers platform as a whole. A routing system for Workers, combined with first-class support for bindings.

Imagine we built a simple API system for both reading and writing to a KV namespace. Any given key could be specified via a URL pathname, with HTTP methods (GET and POST) used as the differentiator between reading or writing. In vanilla Workers, it would look something like this:

export default {
  fetch: async (request, env) => {
    const { method, url } = request.url
    const u = new URL(url)
    const key = u.pathname.replace('/', '')
    if (method == "POST") {
      const body = await request.json()
      if (body.value) {
        await env.KV.put(key, value)
        return new Response("OK")
      } else {
        return new Response("Missing value in body", {
          status: 402
        })
      }
    } elsif (method == "GET") {
      const value = await env.KV.get(key)
      if (!value) {
        return new Response("No message found", {
          status: 502 // TODO: is this the right status code?
        })
      } else {
        return new Response(value)
      }
    } else {
      return new Response("Method not allowed", {
        status: 405
      })
    }
  }
}

There’s a lot of compromises here in order to make this API work cleanly. With no native routing, we match on the inbound request method, and do some sketchy string replacement to approximate a URL-driven “key”. Reading JSON out of the request body is similarly brittle. We could grade this as B- code: it certainly gets the job done, but it won’t hold up to scrutiny and is pretty easy to crash.

Moving this to Hono immediately condenses the code:

const app = new Hono()

app.get("/:key", async c => {
  const { key } = c.req.params
  const value = await c.env.KV.get(key)
  if (!value) {
    return c.text("No message found", 502)
  } else {
    return c.text(value)
  }
})

app.post("/:key", async c => {
  const body = await c.req.json()
  if (body.value) {
    await c.env.KV.put(key, value)
    return c.text("OK")
  } else {
    return c.text("Missing value in body", 402)
  }
})

app.all("/:key", c => {
  return c.text("Method not allowed", 405)
})

(I had more to say here originally, but tbh I lost steam and I need to work on my slides. Sorry!)
Saturday, June 7, 2025

Ecovacs Goat A3000 Review

I recently purchased the Ecovacs Goat A3000 robot lawn-mower (affiliate link). This is an in-progress review as I use it.

Should you buy it?

Maybe. I like a lot about it so far, but I’m still in the first week of setting it up and using it. Stay tuned.

If it can reliably do the majority of what it says it can do, and you can afford it (it was $3k!) it might be worth it. I have a third of an acre, so it’s a lot to mow. The interior of my house is vacuumed on a pretty regular basis by robot vacuums. There is a “wow, cool” factor already on day one, as I see it out in the yard taking care of my grass. Nifty!

Setup

The installation will take roughly an hour. That includes taking everything out of the box, putting together the charger, the associated RTK station, and connecting the lawn mower itself to the app.

The RTK station is the secret sauce that helps the mower understand where it is. I’ll add some pics here at some point. I didn’t understand that there was an RTK station until I put everything together. This means that you’ll need to have an ugly pole about six feet up in the air, somewhere in your yard.

The good news is that the RTK station is pretty small, and it’s not too obtrusive. The bad news is that it’s a pole in your yard. I put mine in the back corner of my yard, where it’s not too visible from the street.

Initial impressions

The mower is pretty cool. It’s a lot quieter than I expected, and it’s pretty fast. It moves around the yard at a decent clip, and it seems to be doing a good job of cutting the grass. I’m excited to see how it does over the next few weeks.

One thing I’m a little concerned about is how well it will handle obstacles. I have a few trees in my yard, and I’m curious to see how well it navigates around them. The app has a feature where you can set up “no-go zones” where the mower won’t go, so I’m going to use that to keep it away from my flower beds.

Conclusion

I’ll update this post as I use the mower more. So far, I’m pretty happy with it. It’s a cool piece of tech, and it’s fun to watch it work. I’m looking forward to seeing how it does over the next few months.

Thursday, April 17, 2025

Setting up TeslaMate with Docker and Proxmox

TeslaMate is an open-source tool that allows you to monitor your Tesla vehicles. It’s a great tool for keeping track of your vehicle’s location, battery level, and other important information. I recently bought a Model Y, and I wanted to be able to monitor the car remotely. TeslaMate also tracks drives - where you started, where you ended, and the drive efficency - which will be a good way to track business travel.

My home lab runs Proxmox. I wanted to be able to run TeslaMate on my home network, so I set up a Docker container. Here’s how I did it. (And if you find this useful, or end up buying a Tesla… use my referral code!)

Create a container

Whenever I want to deploy something in Proxmox, I start with the Proxmox VE Helper-Scripts repo. It has a collection of scripts for creating Proxmox containers.

The Docker script sets up an LXC container (Debian under the hood) with Docker installed. You can run it in the Proxmox console:

$ bash -c "$(curl -fsSL https://raw.githubusercontent.com/community-scripts/ProxmoxVE/main/ct/docker.sh)"

This sets up a new container called docker. It also has docker-compose installed by default.

Better defaults

The LXC container that Proxmox creates is called docker. This isn’t super helpful when running multiple containers in the same Proxmox instance. Each LXC container has a configuration file in /etc/pve/lxc/<id>.conf, named after the container ID. Let’s modify the file for our docker container:

arch: amd64
cores: 2
features: keyctl=1,nesting=1
# Rename the container to something more useful
hostname: teslamate
memory: 2048
net0: name=eth0,bridge=vmbr0,hwaddr=BC:24:11:85:3B:B5,ip=dhcp,type=veth
onboot: 1
ostype: debian
rootfs: local-lvm:vm-105-disk-0,size=4G
swap: 512
tags: community-script;docker;tailscale
# Add configuration to allow Tailscale to run
unprivileged: 1
lxc.cgroup.devices.allow: c 10:200 rwm
lxc.mount.entry: /dev/net dev/net none bind,create=dir

Restart the container inside of the Proxmox UI before continuing.

Configuring the container

Inside of the container, I set up a new directory for TeslaMate:

$ mkdir -p /etc/teslamate

I set up a docker-compose.yml file in that directory:

services:
  teslamate:
    image: teslamate/teslamate:latest
    restart: always
    environment:
      - ENCRYPTION_KEY=ENCRYPTION_KEY
      - DATABASE_USER=teslamate
      - DATABASE_PASS=mysecurepassword
      - DATABASE_NAME=teslamate
      - DATABASE_HOST=database
      - MQTT_HOST=mosquitto
    ports:
      - 4000:4000
    volumes:
      - ./import:/opt/app/import
    cap_drop:
      - all

  database:
    image: postgres:17
    restart: always
    environment:
      - POSTGRES_USER=teslamate
      - POSTGRES_PASSWORD=mysecurepassword
      - POSTGRES_DB=teslamate
    volumes:
      - teslamate-db:/var/lib/postgresql/data

  grafana:
    image: teslamate/grafana:latest
    restart: always
    environment:
      - DATABASE_USER=teslamate
      - DATABASE_PASS=mysecurepassword
      - DATABASE_NAME=teslamate
      - DATABASE_HOST=database
    ports:
      - 3000:3000
    volumes:
      - teslamate-grafana-data:/var/lib/grafana

  mosquitto:
    image: eclipse-mosquitto:2
    restart: always
    command: mosquitto -c /mosquitto-no-auth.conf
    # ports:
    #   - 1883:1883
    volumes:
      - mosquitto-conf:/mosquitto/config
      - mosquitto-data:/mosquitto/data

volumes:
  teslamate-db:
  teslamate-grafana-data:
  mosquitto-conf:
  mosquitto-data:

Obviously, change the ENCRYPTION_KEY and DATABASE_PASS values to something secure. Each instance of mysecurepassword needs to be the same password - these services are all connecting to the same database.

TeslaMate is basically a collection of services - the database, a web server/UI, and a Grafana instance.

Starting up TeslaMate

Now we can start up the containers:

$ docker-compose up -d

You can connect to the TeslaMate UI at http://<your-proxmox-ip>:3000. Use the login from the docker-compose.yml file.

The Grafana UI contains most of the metrics you’ll want to look at, as well as default dashboards. You can connect to it at http://<your-proxmox-ip>:4000. When you first login, you’ll need to change the password.

Authenticating with Tesla

You’ll need to generate a Tesla API key. On macOS, I used TeslaAuth to do this. It’s a CLI you can run locally that spins up a browser window and lets you log in to your Tesla account. Once you’ve authenticated, it will print out API and refresh tokens. You can paste that into TeslaMate to allow it to connect to your car via Tesla’s API.

Set up Tailscale

If we want to access the TeslaMate UI from outside of our network, we need to set up Tailscale. This is easy with this add-tailscale-lxc script. Run this in the Proxmox console (not the LXC container), and select the teslamate container.

$ bash -c "$(curl -fsSL https://raw.githubusercontent.com/community-scripts/ProxmoxVE/main/ct/add-tailscale-lxc.sh)"

Once Tailscale is setup, jump back into the LXC container console. You can start the Tailscale agent with:

$ sudo systemctl start tailscaled
$ tailscale up

Once you’ve authenticated to your Tailscale network, you can access the TeslaMate UI easily from any other machine in your Tailscale network: http://teslamate:3000 or http://teslamate:4000.

Dashboards

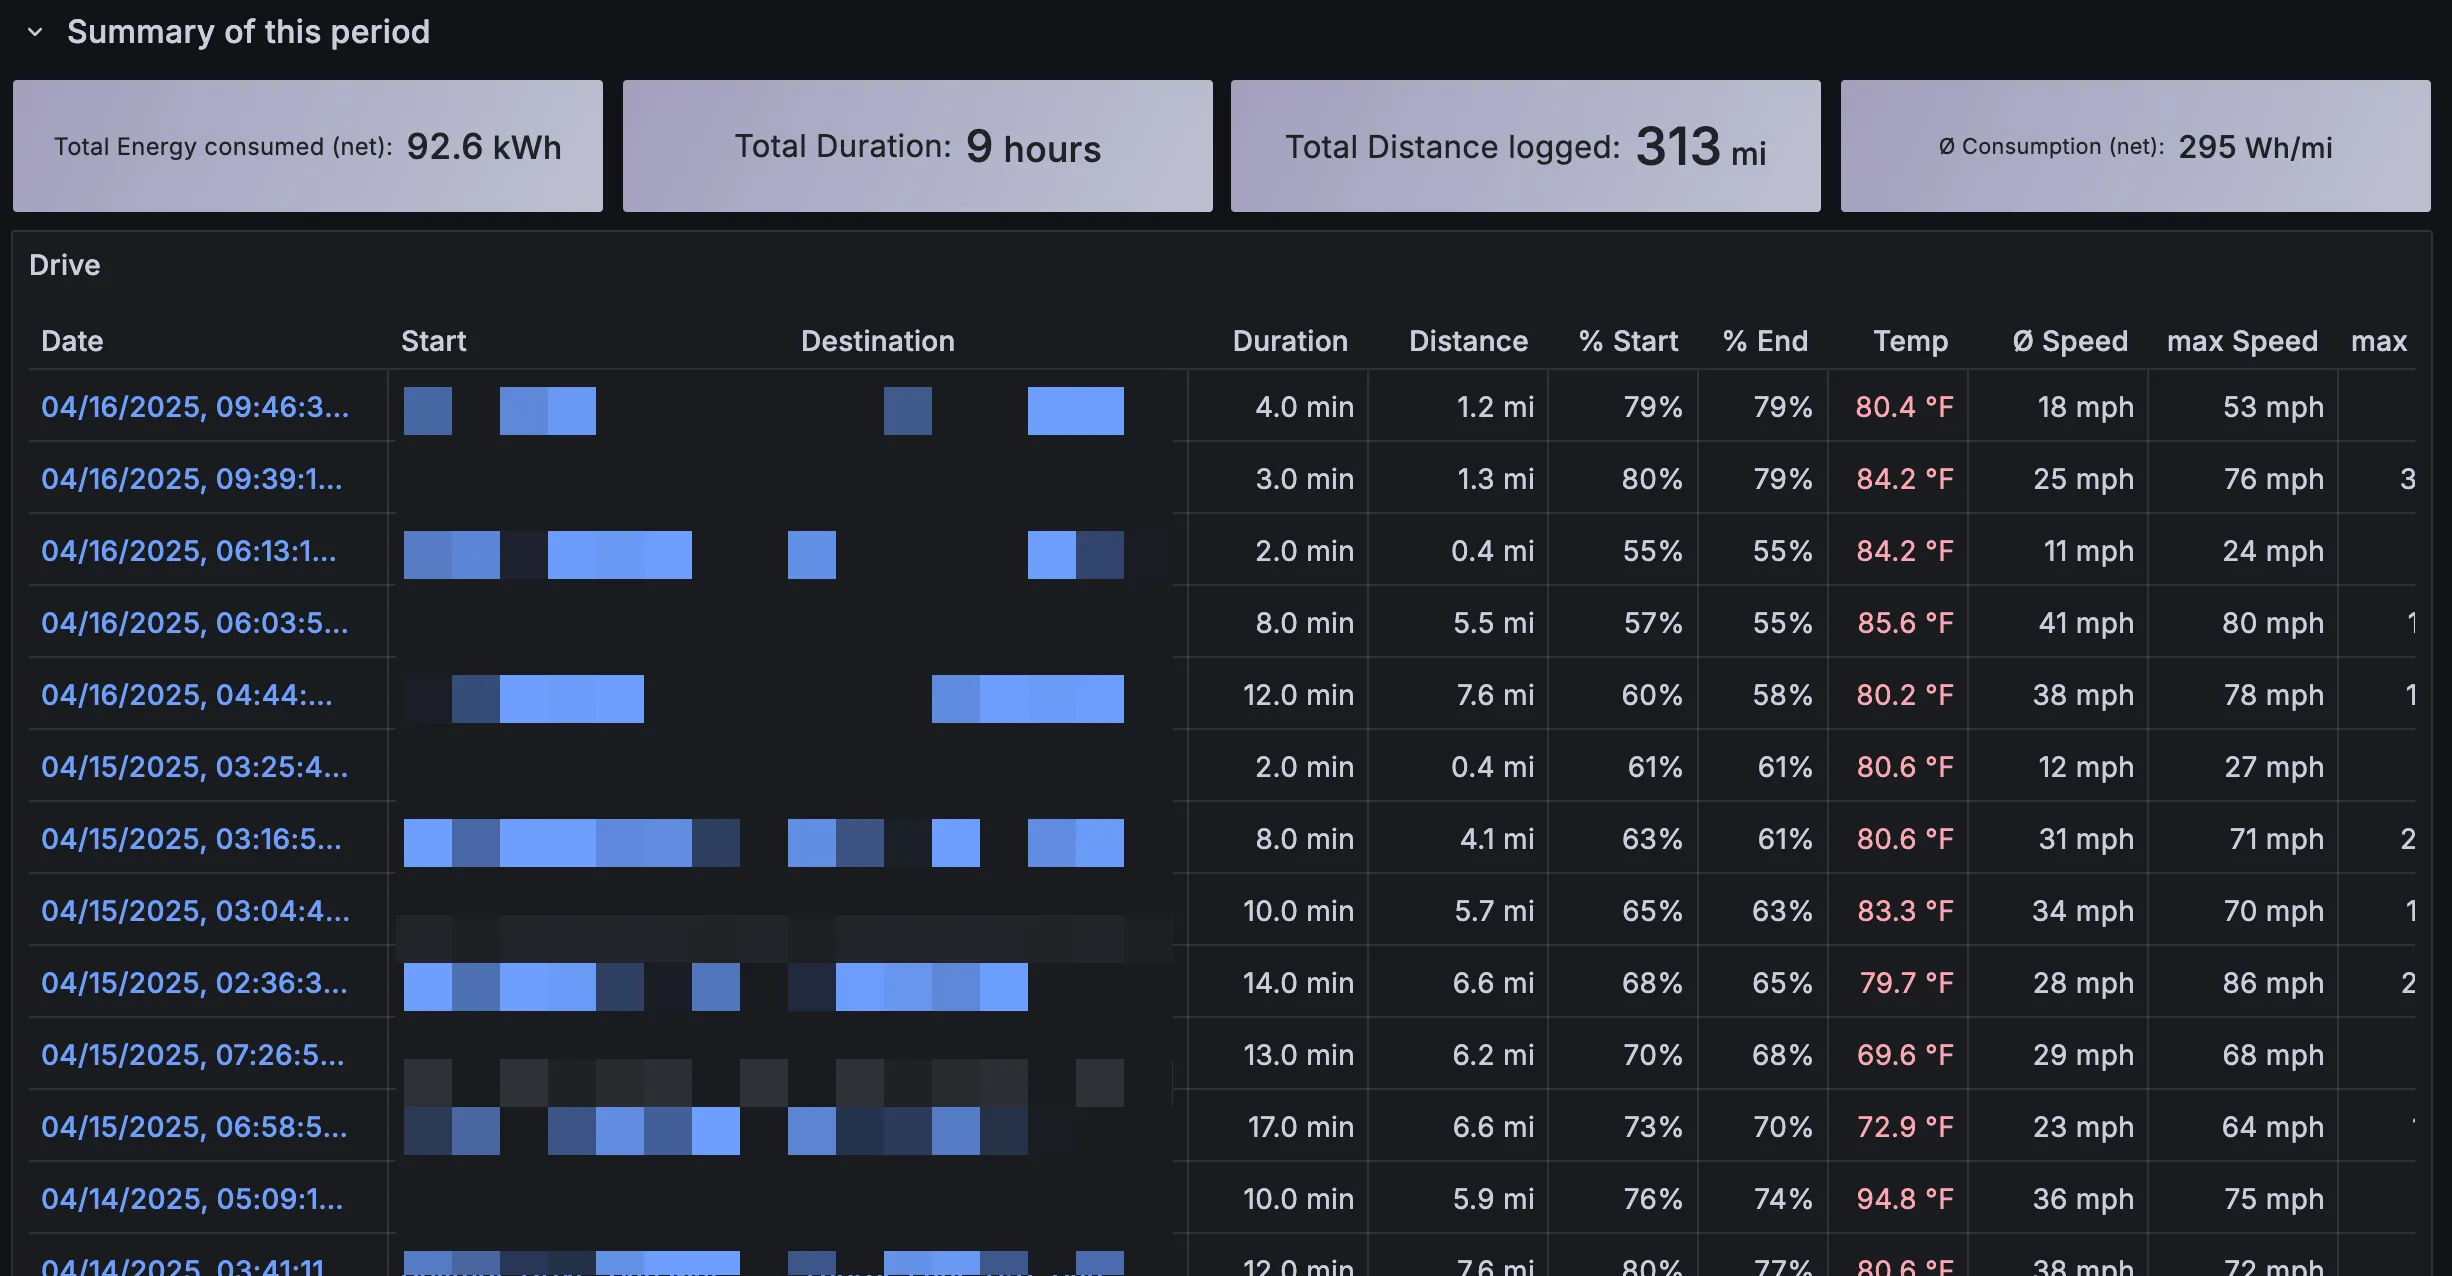
There’s a ton of info in the default dashboards set up by TeslaMate. The “Drives” one is a good example, showing every drive I’ve taken in my car:

TeslaMate Grafana dashboard

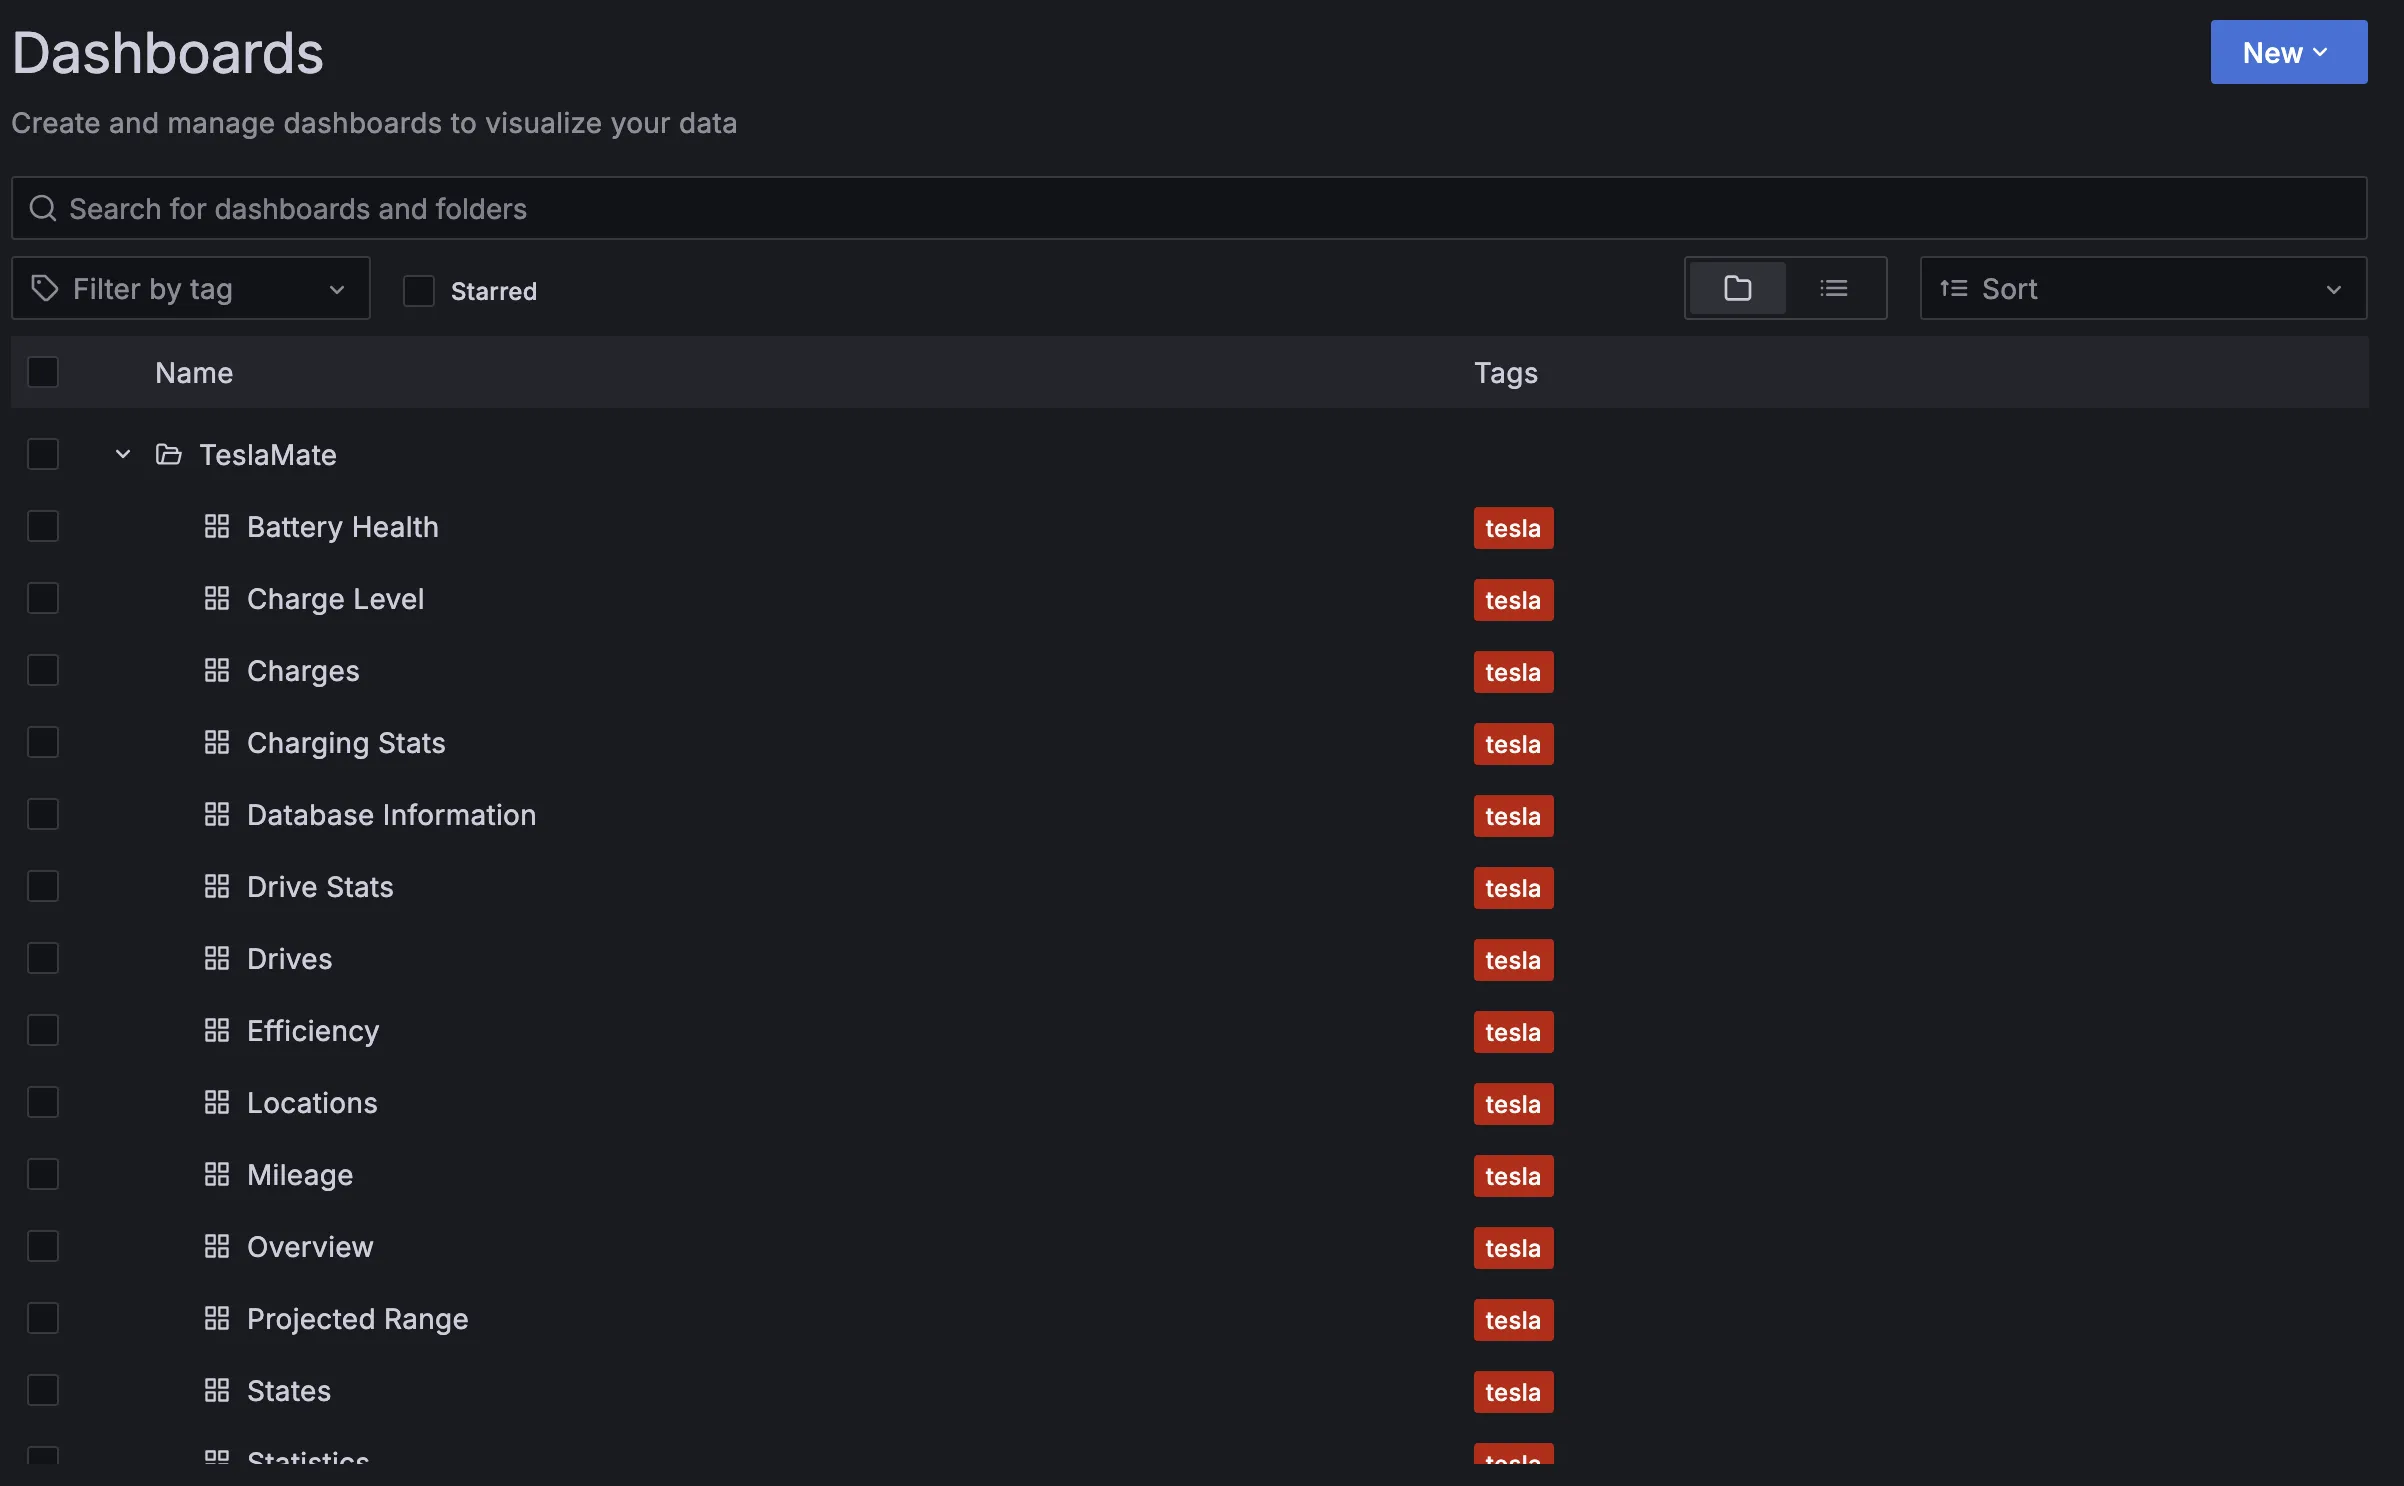
There’s a ton of other dashboards too, for tracking all sorts of information about the car:

TeslaMate Grafana dashboard

Raycast extension

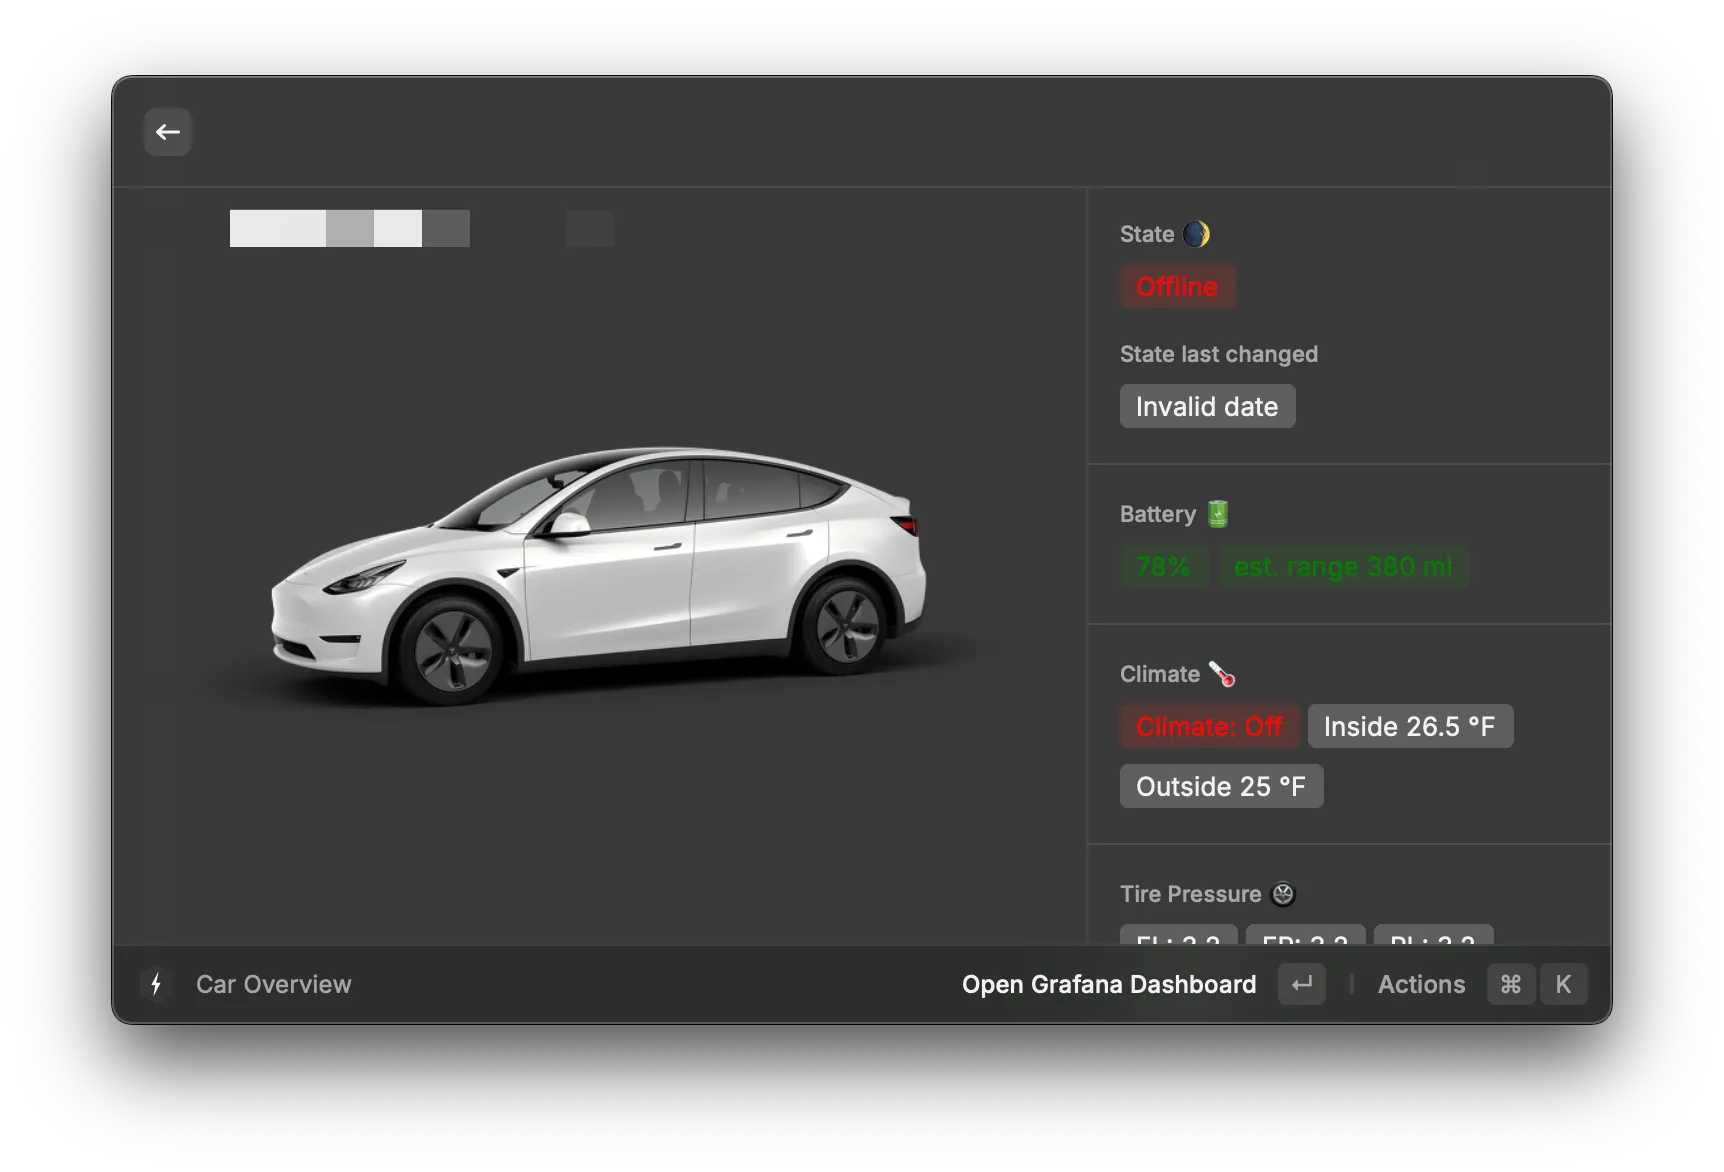
A neat party trick is using the TeslaMate extension for Raycast to view your car info directly in Raycast. The only requirement is that your computer needs to be in the same Tailscale network as your TeslaMate instance.

TeslaMate Raycast extension

Note that a bunch of stuff here doesn’t render correctly. It’s on my list of things to look at - since all the extensions in Raycast are open source, I could contribute some bug reports or even fix them myself. For now, I care mostly about seeing the battery status - especially if I’m charging at work. It’s awesome to have access to it from Raycast.

There’s a bit of setup needed for this extension to work. Using the instructions in the Raycast extension docs, you can set up a Service Account Token and datasource UID:

How to create Service Account Token for Grafana

1. Go to your Grafana instance
2. In the left menubar click on Users and access
3. Click on Service accounts
4. Click on Add service account
5. Choose any Display name for your service account
6. Set service account role to Viewer
7. Click on Create
8. Click on Add service account token
9. Choose any Display name for your service account token
10. Set Expiration to No expiration
11. Copy your token to the TeslaMate Raycast Extension 🎉

How to get the UID of the datasource

1. Go to your Grafana instance
2. In the left menubar click on Connections -> Data sources
3. Click on the DB TeslaMate PostgreSQL
4. The URL should now show something like /connections/edit/Pxxxxxxxxx
5. The Pxxxxxxxxx is the UID of your data source - copy it to the TeslaMate Raycast Extension 🎉

Conclusion

It’s fun to have API access to your car. TeslaMate takes a lot of the raw data out of the car and makes it available in a nice series of dashboards. It also can be run for free, using off-the-shelf Docker Compose scripts and the computers you probably already have running at home.

If you find this useful, or end up buying a Tesla… use my referral code!